本篇可以配合《SpringCloud-配置中心 Config 》来看,《SpringCloud-配置中心 Config 》中是基于SOFABoot 来集成 Spring Cloud Config 的一个 demo 案例。
在demo中,涉及到三个角色:
配置中心服务端:为配置客户端提供对应的配置信息,配置信息的来源是配置仓库。应用启动时,会从配置仓库拉取配置信息缓存到本地仓库中。
配置中心客户端:应用启动时从配置服务端拉取配置信息。
配置仓库:为配置中心服务端提供配置信息存储,Spring Cloud Config 默认是使用git作为仓库的。
整体过程:
环境部署之前,将所需的配置信息推送到配置仓库
启动配置中心服务端,将配置仓库的配置信息拉取到服务端,配置服务端对外提供REST接口
启动配置客户端,客户端根据 spring.cloud.config 配置的信息去服务器拉取相应的配置
服务端实现 配置中心服务端主要做了几件事情:连接配置仓库、拉取远程配置&本地缓存、对外提供API接口服务。
@EnableConfigServer 及配置类 注解 EnableConfigServer 可以开启应用服务对配置中心的支持。当开启之后,配置服务器就会在启动时进行自动配置。具体对应的配置类是 ConfigServerAutoConfiguration,然后又在 ConfigServerAutoConfiguration 这个配置类中引入了其他很多配置类。如下:
1
2
3
4
5
6
7
8
@Configuration @ConditionalOnBean({Marker.class}) @EnableConfigurationProperties({ConfigServerProperties.class}) @Import({EnvironmentRepositoryConfiguration.class, CompositeConfiguration.class, ResourceRepositoryConfiguration.class, ConfigServerEncryptionConfiguration.class, ConfigServerMvcConfiguration.class}) public class ConfigServerAutoConfiguration { public ConfigServerAutoConfiguration () { } }
EnvironmentRepositoryConfiguration: 环境变量存储相关的配置类
CompositeConfiguration:组合方式的环境仓库配置类
ResourceRepositoryConfiguration:资源仓库相关的配置类
ConfigServerEncryptionConfiguration:加密断点相关的配置类
ConfigServerMvcConfiguration:对外暴露的MVC端点控制器的配置类
无论是 Spring Cloud 自身提供的默认实现 git ,还是 zk,或者 apollo ;基本思路都是在程序启动时将远端配置拉取到本地作为环境变量来使用,但这些是针对客户端角度来说的。Spring Cloud Config Server 因为其本身是以服务端存在,所以 Config Server 本身的实现思路也值得后面开发借鉴。
对于服务端来说,其基本职责就是能够将具体存储中的配置信息先拿到,然后提供出 API 供客户端来调用。下面从ConfigServerAutoConfiguration 中 import的这些配置类来具体看下实现。
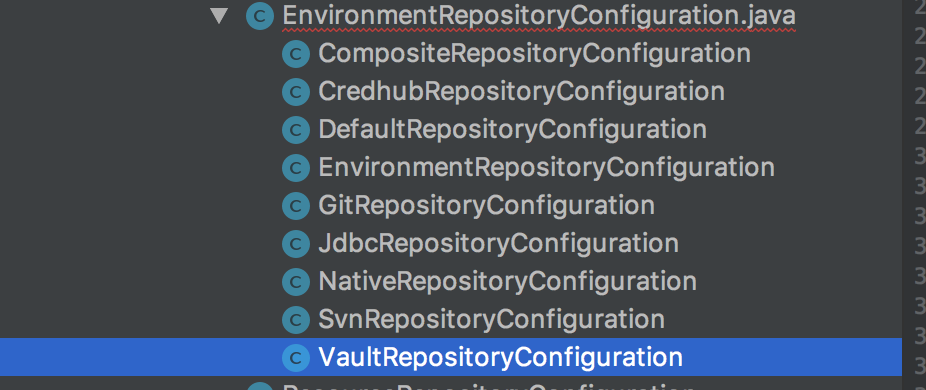
EnvironmentRepositoryConfiguration EnvironmentRepositoryConfiguration 是环境变量存储相关的配置类,它本身也提供了很多实现:
上图中可以看到,环境配置仓库支持的有JDBC、SVN、本地文件系统、Git等等。这些对不同环境仓库的支持,在实现上基本都差不多,下面以默认提供的方式git来分析。
1
2
3
4
@Configuration @Profile("git") class GitRepositoryConfiguration extends DefaultRepositoryConfiguration {}
GitRepositoryConfiguration 集成了 DefaultRepositoryConfiguration,这也说明了 Spring Cloud Config 默认使用的是Git。不同的配置类实现都会被标注一个@Profile,可以通过这个来激活相应的配置类;具体做法是在配置服务端的 application.properties(application.yml) 中来指定:
1 spring.profile.active=git
没有设置就是默认使用 GIt。
1
2
3
4
5
6
7
8
9
10
11
12
13
14
15
16
17
18
19
@Configuration @ConditionalOnMissingBean(value = EnvironmentRepository.class, search = SearchStrategy.CURRENT) class DefaultRepositoryConfiguration { @Autowired private ConfigurableEnvironment environment; @Autowired private ConfigServerProperties server; @Autowired(required = false) private TransportConfigCallback customTransportConfigCallback; @Bean public MultipleJGitEnvironmentRepository defaultEnvironmentRepository ( MultipleJGitEnvironmentRepositoryFactory gitEnvironmentRepositoryFactory, MultipleJGitEnvironmentProperties environmentProperties) throws Exception { return gitEnvironmentRepositoryFactory.build(environmentProperties); } }
DefaultRepositoryConfiguration 的 ConditionalOnMissingBean 可以知道,如果上下文中没有 EnvironmentRepository,那么就使用 DefaultRepositoryConfiguration。
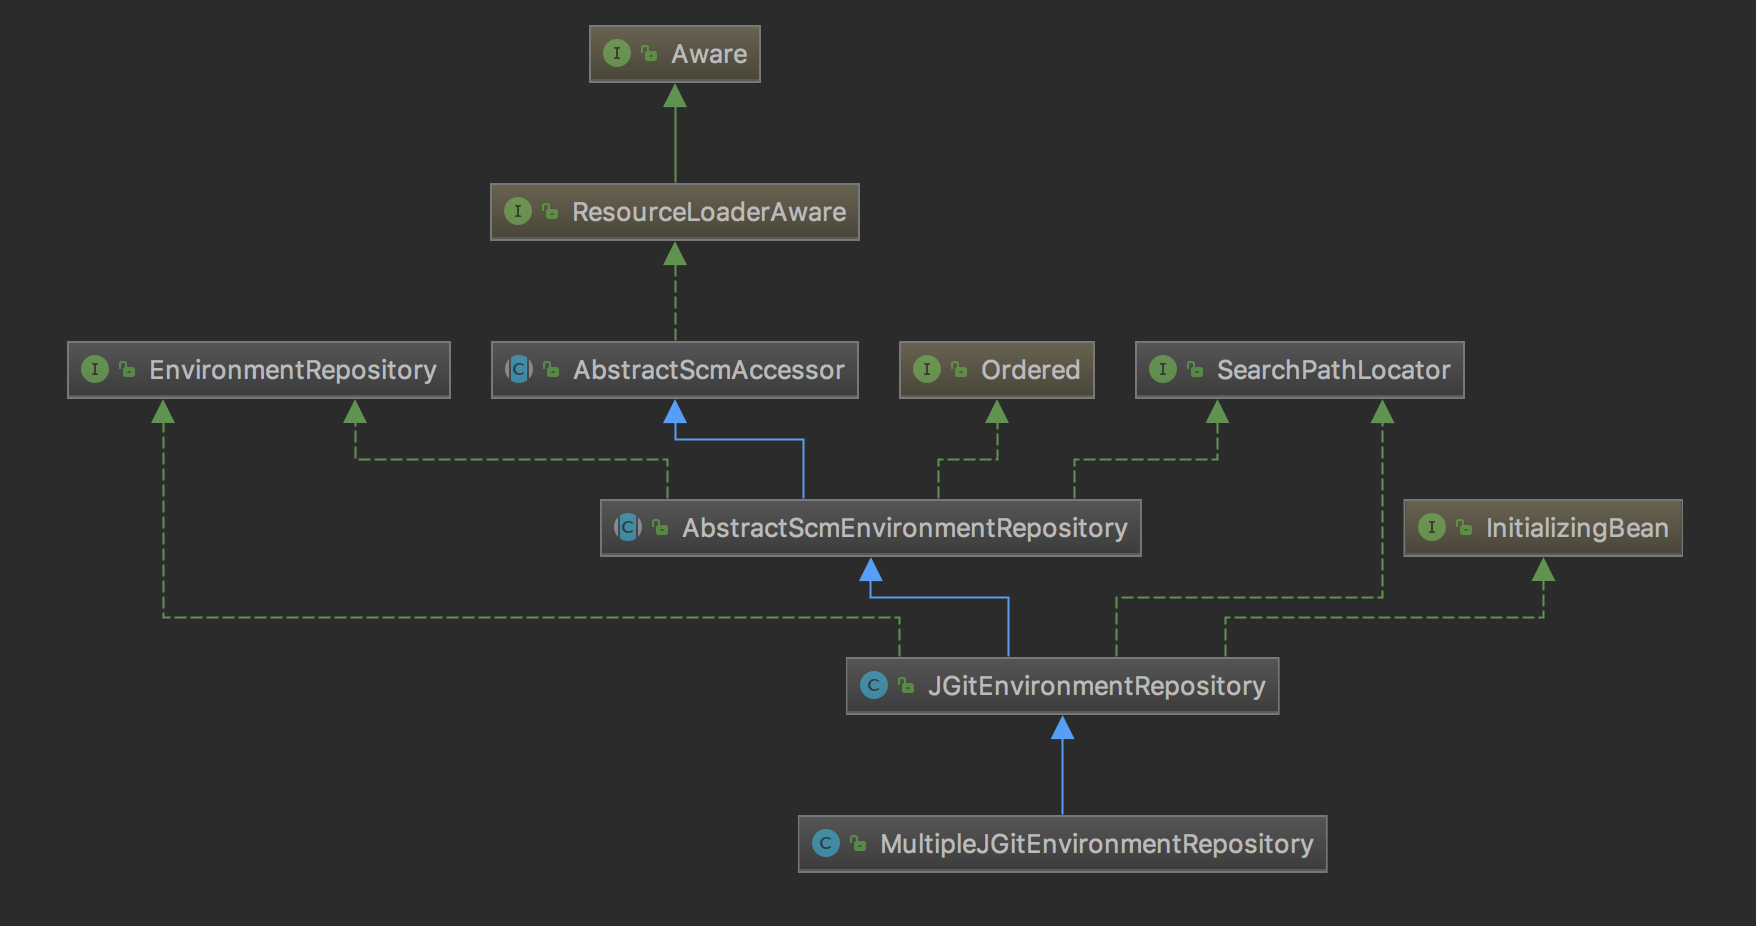
MultipleJGitEnvironmentRepository MultipleJGitEnvironmentRepository 是 Git 存储的具体实现类,下面是类图结构:
MultipleJGitEnvironmentRepository 的顶层接口是 EnvironmentRepository ,当然其他的实现也都是实现了这个接口的。另外一个需要关注的是 SearchPathLocator。
EnvironmentRepository:定义了获取指定应用服务环境信息的方法,返回一个Enviroment
1
2
3
public interface EnvironmentRepository { Environment findOne (String application, String profile, String label) ; }
三个参数,application、profile、label;《SpringCloud-配置中心 Config 》 中客户端部分有对这三个的参数的说明及使用方式,通过这三个参数可以具体定位到配置信息。
SearchPathLocator 中有一个内部类 Locations ,Locdations中定义了应用服务配置存储信息。
除了这两个之外,还有一个 AbstractScmAccessor,这个抽象类里面定义了一些列与git存储相关的属性和方法。包括远程仓库的地址、账户、密码、ssh 私钥、本地仓库的地址等等。
SCM : 软件配置管理
AbstractScmEnvironmentRepository AbstractScmEnvironmentRepository 实现了 AbstractScmAccessor 和 EnvironmentRepository ,主要就是EnvironmentRepository 中 findOne 的实现:
1
2
3
4
5
6
7
8
9
10
11
12
13
14
15
@Override public synchronized Environment findOne (String application, String profile, String label) { NativeEnvironmentRepository delegate = new NativeEnvironmentRepository (getEnvironment(), new NativeEnvironmentProperties ()); Locations locations = getLocations(application, profile, label); delegate.setSearchLocations(locations.getLocations()); Environment result = delegate.findOne(application, profile, "" ); result.setVersion(locations.getVersion()); result.setLabel(label); return this .cleaner.clean(result, getWorkingDirectory().toURI().toString(), getUri()); }
getLocations 是一个模板方法,Config Server中提供了三种实现:
分别是单 Git 仓库,多 Git 仓库和 Svn 仓库实现。
1
2
3
4
5
6
7
8
9
10
11
12
@Override public synchronized Locations getLocations (String application, String profile, String label) { if (label == null ) { label = this .defaultLabel; } String version = refresh(label); return new Locations (application, profile, label, version, getSearchLocations(getWorkingDirectory(), application, profile, label)); }
refresh 方法做的作用就是刷新本地仓库的配置状态,这样就能保证每次都能拉取到最新的配置信息。下面来分析这个方法。
JGitEnvironmentRepository#refresh 1 2 3 4 5 6 7 8 9 10 11 12 13 14 15 16 17 18 19 20 21 22 23 24 25 26 27 28 29 30 31 public String refresh (String label) { Git git = null ; try { git = createGitClient(); if (shouldPull(git)) { FetchResult fetchStatus = fetch(git, label); if (deleteUntrackedBranches && fetchStatus != null ) { deleteUntrackedLocalBranches(fetchStatus.getTrackingRefUpdates(), git); } checkout(git, label); tryMerge(git, label); } else { checkout(git, label); tryMerge(git, label); } return git.getRepository().findRef("HEAD" ).getObjectId().getName(); } catch (Exception e) { } finally { } }
这个里面基本就是通过git客户端的一些操作。先是检查远程仓库的状态,然后判断本地仓库是否要执行刷新操作。如果有状态更新,比如新的提交时,Git客户端就会执行fetch,然后再进行merge,更新到本地仓库。
MultipleJGitEnvironmentRepository 多仓库的支持,实际上就是遍历了所有的仓库。其他仓库和单仓库是一样的。
客户端实现 Spring Cloud Config Client 没有像其他组件一样提供@EnableConfigClient注解,这里没有必要去标注是一个配置客户端,只要引入了spring-cloud-config-client 依赖即可。
思路也很清楚,就是在启动时从服务端把配置信息拉取到本地,然后设置到 Enviroment 中。Spring Cloud Config中有两种形式,一种是指定 url,另外一种是通过服务发现,默认是通过指定URI的方式。这里还是先从客户端的自动配置来分析。
1 2 3 4 5 6 7 8 9 10 11 12 13 14 15 16 17 18 19 20 21 22 23 24 25 26 27 28 29 30 31 32 33 34 35 36 37 38 39 40 41 42 43 @Configuration @EnableConfigurationProperties public class ConfigServiceBootstrapConfiguration { @Autowired private ConfigurableEnvironment environment; @Bean public ConfigClientProperties configClientProperties () { ConfigClientProperties client = new ConfigClientProperties (this .environment); return client; } @Bean @ConditionalOnMissingBean(ConfigServicePropertySourceLocator.class) @ConditionalOnProperty(value = "spring.cloud.config.enabled", matchIfMissing = true) public ConfigServicePropertySourceLocator configServicePropertySource (ConfigClientProperties properties) { ConfigServicePropertySourceLocator locator = new ConfigServicePropertySourceLocator ( properties); return locator; } @ConditionalOnProperty(value = "spring.cloud.config.fail-fast") @ConditionalOnClass({ Retryable.class, Aspect.class, AopAutoConfiguration.class }) @Configuration @EnableRetry(proxyTargetClass = true) @Import(AopAutoConfiguration.class) @EnableConfigurationProperties(RetryProperties.class) protected static class RetryConfiguration { @Bean @ConditionalOnMissingBean(name = "configServerRetryInterceptor") public RetryOperationsInterceptor configServerRetryInterceptor ( RetryProperties properties) { return RetryInterceptorBuilder .stateless() .backOffOptions(properties.getInitialInterval(), properties.getMultiplier(), properties.getMaxInterval()) .maxAttempts(properties.getMaxAttempts()).build(); } } }
这个配置类中初始化了两个bean:
ConfigClientProperties : 对客户端的属性进行配置。
ConfigServicePropertySourceLocator:从远程服务器上请求对应的配置信息,然后注册到容器的Enviroment 对象中去。
ConfigClientProperties 中就是客户端的一些属性,如:profile、应用名、标签、远端服务地址等。没有什么特殊的逻辑。主要来看下 ConfigServicePropertySourceLocator 。
ConfigServicePropertySourceLocator ConfigServicePropertySourceLocator 实现了 PropertySourceLocator 接口,PropertySourceLocator 接口的作用就是用来定位 PropertySource 的。直接看locate方法的实现(删除了无关代码):
1 2 3 4 5 6 7 8 9 10 11 12 13 14 15 16 17 18 19 20 21 22 23 24 25 26 27 28 29 30 31 32 33 34 35 36 37 38 39 40 41 42 43 44 45 46 47 48 49 50 51 52 53 54 55 56 57 58 @Override @Retryable(interceptor = "configServerRetryInterceptor") public PropertySource<?> locate(Environment environment) { ConfigClientProperties properties = this .defaultProperties.override(environment); CompositePropertySource composite = new CompositePropertySource ("configService" ); RestTemplate restTemplate = this .restTemplate == null ? getSecureRestTemplate(properties) : this .restTemplate; try { String[] labels = new String [] { "" }; if (StringUtils.hasText(properties.getLabel())) { labels = StringUtils.commaDelimitedListToStringArray(properties.getLabel()); } String state = ConfigClientStateHolder.getState(); for (String label : labels) { Environment result = getRemoteEnvironment(restTemplate, properties, label.trim(), state); if (result != null ) { log(result); if (result.getPropertySources() != null ) { for (PropertySource source : result.getPropertySources()) { @SuppressWarnings("unchecked") Map<String, Object> map = (Map<String, Object>) source .getSource(); composite.addPropertySource( new MapPropertySource (source.getName(), map)); } } if (StringUtils.hasText(result.getState()) || StringUtils.hasText(result.getVersion())) { HashMap<String, Object> map = new HashMap <>(); putValue(map, "config.client.state" , result.getState()); putValue(map, "config.client.version" , result.getVersion()); composite.addFirstPropertySource( new MapPropertySource ("configClient" , map)); } return composite; } } } catch (Exception e) { } if (properties.isFailFast()) { } return null ; }
上面代码片段中实际从远端获取配置信息是在 getRemoteEnvironment 这个方法中,以Http 请求的方式获取。获取到配置信息之后是放在 CompositePropertySource 对象中,代码较长,逻辑也比较简单,建议直接阅读源码。
注入到 Enviroment 中 这部分操作是在 Spring Cloud Context 中的入口来完成的。具体参考bootstrapServiceContext 创建&启动 。
这里会通过 Spring Cloud Context 中的 PropertySourceBootstrapConfiguration 配置类将PropertySourceLocator 自定义属性值添加到引导上下文的环境当中。
基于服务发现的方式获取配置 前面两个小节均是基于指定 http url 的方式获取配置文件的。Spring Cloud Config 中还有一种方式就是基于服务发现的方式。其实这种方式说到底还是基于指定 http url的方式调用,只是通过服务发现找到服务端地址;当然既然有服务的发现与注册,也就会涉及到客户端与服务端之间的会话保证,及时更新可用服务列表这些功能。
1
2
3
4
5
6
7
8
9
10
11
12
@Retryable(interceptor = "configServerRetryInterceptor") public List<ServiceInstance> getConfigServerInstances (String serviceId) { logger.debug("Locating configserver (" + serviceId + ") via discovery" ); List<ServiceInstance> instances = this .client.getInstances(serviceId); if (instances.isEmpty()) { throw new IllegalStateException ( "No instances found of configserver (" + serviceId + ")" ); } logger.debug("Located configserver (" + serviceId + ") via discovery. No of instances found: " + instances.size()); return instances; }
通过 DiscoveryClient 客户端,以指定serviceId的方式拿到服务地址。
DiscoveryClientConfigServiceBootstrapConfiguration 这个自动配置类实现了 ApplicationListener,用于监听上下文刷新事件;DiscoveryClient 在具体的实现中会将上下文刷新事件进行广播,然后执行刷新操作。心跳里面也是执行的刷新操作。对应的方法是DiscoveryClientConfigServiceBootstrapConfiguration#refresh。也就是 refresh方法会根据上下文环境和心跳事件,刷新服务实例。
以 ZK 作为配置中心 《SpringCloud-配置中心 spring-cloud-zk 》demo 中介绍了如何使用 zk 作为配置中心。以zk作为配置中心也就是配置信息将从zk中来获取;具体实现也就是实现 PropertySourceLocator 接口,在locate方法中通过zk客户端从zk服务端拉取配置信息。具体实现在ZookeeperPropertySourceLocator#locate中
1
2
3
4
5
6
7
8
9
10
@Override public PropertySource<?> locate(Environment environment) { if (environment instanceof ConfigurableEnvironment) { PropertySource propertySource = create(propertySourceContext); } }
其他代码片段都省略了,获取 PropertySource 是在 create 方法中,create 方法返回一个 ZookeeperPropertySource 实例对象。在构造函数中,有通过zk客户端去拉取配置信息,具体逻辑在findProperties 方法中:
1
2
3
4
5
6
7
8
9
10
11
12
13
14
15
16
17
18
19
20
21
22
private void findProperties (String path, List<String> children) { try { for (String child : children) { String childPath = path + "/" + child; List<String> childPathChildren = getChildren(childPath); byte [] bytes = getPropertyBytes(childPath); if (bytes == null || bytes.length == 0 ) { if (childPathChildren == null || childPathChildren.isEmpty()) { registerKeyValue(childPath, "" ); } } else { registerKeyValue(childPath, new String (bytes, Charset.forName("UTF-8" ))); } findProperties(childPath, childPathChildren); } } catch (Exception exception) { } }
自动刷新机制 当修改配置信息之后,通过zk自身的监听机制,通知客户端。这个机制是在ZookeeperConfigAutoConfiguration自动配置类中提供。
1
2
3
4
5
6
7
8
9
10
@Configuration @ConditionalOnClass(RefreshEndpoint.class) protected static class ZkRefreshConfiguration { @Bean @ConditionalOnProperty(name = "spring.cloud.zookeeper.config.watcher.enabled", matchIfMissing = true) public ConfigWatcher configWatcher (ZookeeperPropertySourceLocator locator, CuratorFramework curator) { return new ConfigWatcher (locator.getContexts(), curator); } }
ConfigWatcher 实现了 Closeable、TreeCacheListener 和 ApplicationEventPublisherAware 三个接口。Tree Cache 用于观察所有节点的所有数据状态,ApplicationEventPublisherAware用户提供一个publiser,用来发布RefreshEvent 事件。Closeable 用于实现优雅关闭。
所有当我们改变zk数据节点时,就是触发例如 NODE_ADDED 、NODE_REMOVED、NODE_UPDATED 等事件类型,然后publiser就会发布一个 RefreshEvent 事件,通知客户端进行配置更新操作。从而实现配置的自动刷新。