继续承接上一篇 SpringBoot 系列-启动过程分析,本篇围绕一个 bean 的生命周期,对 bean 进行一些修改和扩展。
本篇将涉及到以下主要内容:
阅读之前
下面是本篇文章的“主人公” TestBeanService ,定义如下:
1
2
3
4
5
6
7
8
9
10
11
12
13
14
15
16
| public class TestBeanService {
@Autowired
private InjectBeanService injectBeanService;
@Value("${spring.application.name}")
private String appName;
public String test() {
return injectBeanService.testInject();
}
}
|
TestBeanService 里面包括两个属性,一个是 injectBeanService ,另外一个是 appName,分别通过 @Autowired 和 @Value 注入值。本篇最终希望完成的目标是能够完成了解 Bean 属性注入的过程,以及 Bean 的实例化过程;除此之外,从 Spring 扩展的角度,来对 BeanFactoryPostProcess、BeanPostProcess、ApplicationListener、InitializingBean 以及 initMethod 的执行时机和作用进行分析。
TestBeanService 被解析成 BeanDifinition 的时机与过程
Spring 容器刷新流程非常复杂,当我们想 debug BeanDifinition 加载过程时可能没法很快找到入口,这里可以直接面向 BeanDifinition 的最终去向来 debug。我们知道 BeanFactory 接口本身是不具体注册 BeanDifinition 能力的,这个能力是由 BeanDefinitionRegistry 接口提供。那么就看下 BeanDefinitionRegistry 的 registerBeanDefinition 方法有几个具体的实现,然后在这几个实现出打上断点,执行找到具体的处理入口。
我们将断点打在 DefaultListableBeanFactory#registerBeanDefinition 这个方法入口处,debug 模式运行工程,可以看到断点进入时的情况如下图所示:

这里通过执行堆栈逆向找到 BeanDifinition 的加载入口是容器刷新阶段的 invokeBeanFactoryPostProcessors 方法;这里就详细分析下 testBeanService 这个 beandifition 是怎么被注册到容器中的。
invokeBeanFactoryPostProcessors 执行过程分析
invokeBeanFactoryPostProcessors 这个方法实现非常长,但是基本处理过程很简单,存在很多重复的步骤。为了方便理解整个过程,这里还是有必要贴一下代码,代码中会详细标注所做的事情是什么,这个过程是构建 BeanFactory 非常重要一步。掌握这个过程,就可以随意玩转 BeanFactoryPostProcessor 了。
1
2
3
4
5
6
7
8
9
10
11
12
13
14
15
16
17
18
19
20
21
22
23
24
25
26
27
28
29
30
31
32
33
34
35
36
37
38
39
40
41
42
43
44
45
46
47
48
49
50
51
52
53
54
55
56
57
58
59
60
61
62
63
64
65
66
67
68
69
70
71
72
73
74
75
76
77
78
79
80
81
82
83
84
85
86
87
88
89
90
91
92
93
94
95
96
97
98
99
100
101
102
103
104
105
106
107
108
109
110
111
112
113
114
115
116
117
118
119
120
121
122
123
124
125
126
127
128
129
130
131
132
133
134
135
136
137
138
139
140
141
| public static void invokeBeanFactoryPostProcessors(
ConfigurableListableBeanFactory beanFactory, List<BeanFactoryPostProcessor> beanFactoryPostProcessors) {
Set<String> processedBeans = new HashSet<>();
if (beanFactory instanceof BeanDefinitionRegistry) {
BeanDefinitionRegistry registry = (BeanDefinitionRegistry) beanFactory;
List<BeanFactoryPostProcessor> regularPostProcessors = new ArrayList<>();
List<BeanDefinitionRegistryPostProcessor> registryProcessors = new ArrayList<>();
for (BeanFactoryPostProcessor postProcessor : beanFactoryPostProcessors) {
if (postProcessor instanceof BeanDefinitionRegistryPostProcessor) {
BeanDefinitionRegistryPostProcessor registryProcessor =
(BeanDefinitionRegistryPostProcessor) postProcessor;
registryProcessor.postProcessBeanDefinitionRegistry(registry);
registryProcessors.add(registryProcessor);
}
else {
regularPostProcessors.add(postProcessor);
}
}
List<BeanDefinitionRegistryPostProcessor> currentRegistryProcessors = new ArrayList<>();
String[] postProcessorNames =
beanFactory.getBeanNamesForType(BeanDefinitionRegistryPostProcessor.class, true, false);
for (String ppName : postProcessorNames) {
if (beanFactory.isTypeMatch(ppName, PriorityOrdered.class)) {
currentRegistryProcessors.add(beanFactory.getBean(ppName, BeanDefinitionRegistryPostProcessor.class));
processedBeans.add(ppName);
}
}
sortPostProcessors(currentRegistryProcessors, beanFactory);
registryProcessors.addAll(currentRegistryProcessors);
invokeBeanDefinitionRegistryPostProcessors(currentRegistryProcessors, registry);
currentRegistryProcessors.clear();
postProcessorNames = beanFactory.getBeanNamesForType(BeanDefinitionRegistryPostProcessor.class, true, false);
for (String ppName : postProcessorNames) {
if (!processedBeans.contains(ppName) && beanFactory.isTypeMatch(ppName, Ordered.class)) {
currentRegistryProcessors.add(beanFactory.getBean(ppName, BeanDefinitionRegistryPostProcessor.class));
processedBeans.add(ppName);
}
}
sortPostProcessors(currentRegistryProcessors, beanFactory);
registryProcessors.addAll(currentRegistryProcessors);
invokeBeanDefinitionRegistryPostProcessors(currentRegistryProcessors, registry);
currentRegistryProcessors.clear();
boolean reiterate = true;
while (reiterate) {
reiterate = false;
postProcessorNames = beanFactory.getBeanNamesForType(BeanDefinitionRegistryPostProcessor.class, true, false);
for (String ppName : postProcessorNames) {
if (!processedBeans.contains(ppName)) {
currentRegistryProcessors.add(beanFactory.getBean(ppName, BeanDefinitionRegistryPostProcessor.class));
processedBeans.add(ppName);
reiterate = true;
}
}
sortPostProcessors(currentRegistryProcessors, beanFactory);
registryProcessors.addAll(currentRegistryProcessors);
invokeBeanDefinitionRegistryPostProcessors(currentRegistryProcessors, registry);
currentRegistryProcessors.clear();
}
invokeBeanFactoryPostProcessors(registryProcessors, beanFactory);
invokeBeanFactoryPostProcessors(regularPostProcessors, beanFactory);
}
else {
invokeBeanFactoryPostProcessors(beanFactoryPostProcessors, beanFactory);
}
String[] postProcessorNames =
beanFactory.getBeanNamesForType(BeanFactoryPostProcessor.class, true, false);
List<BeanFactoryPostProcessor> priorityOrderedPostProcessors = new ArrayList<>();
List<String> orderedPostProcessorNames = new ArrayList<>();
List<String> nonOrderedPostProcessorNames = new ArrayList<>();
for (String ppName : postProcessorNames) {
if (processedBeans.contains(ppName)) {
}
else if (beanFactory.isTypeMatch(ppName, PriorityOrdered.class)) {
priorityOrderedPostProcessors.add(beanFactory.getBean(ppName, BeanFactoryPostProcessor.class));
}
else if (beanFactory.isTypeMatch(ppName, Ordered.class)) {
orderedPostProcessorNames.add(ppName);
}
else {
nonOrderedPostProcessorNames.add(ppName);
}
}
sortPostProcessors(priorityOrderedPostProcessors, beanFactory);
invokeBeanFactoryPostProcessors(priorityOrderedPostProcessors, beanFactory);
List<BeanFactoryPostProcessor> orderedPostProcessors = new ArrayList<>(orderedPostProcessorNames.size());
for (String postProcessorName : orderedPostProcessorNames) {
orderedPostProcessors.add(beanFactory.getBean(postProcessorName, BeanFactoryPostProcessor.class));
}
sortPostProcessors(orderedPostProcessors, beanFactory);
invokeBeanFactoryPostProcessors(orderedPostProcessors, beanFactory);
List<BeanFactoryPostProcessor> nonOrderedPostProcessors = new ArrayList<>(nonOrderedPostProcessorNames.size());
for (String postProcessorName : nonOrderedPostProcessorNames) {
nonOrderedPostProcessors.add(beanFactory.getBean(postProcessorName, BeanFactoryPostProcessor.class));
}
invokeBeanFactoryPostProcessors(nonOrderedPostProcessors, beanFactory);
beanFactory.clearMetadataCache();
}
|
上面代码段中大体就是,先处理 BeanDefinitionRegistryPostProcessor 类型的 BeanFactoryPostProcessor ,然后再处理普通的 BeanFactoryPostProcessor;在这里处理过程中,会根据一些排序规则来调整各个 BeanFactoryPostProcessor 的执行顺序。
这里先处理 BeanDefinitionRegistryPostProcessor 类型的 BeanFactoryPostProcessor 是一定的,因为需要在这个阶段去注册 BeanDefinition。在 classpath 下的所有 BeanDefinition 都被注册之后,再执行普通 BeanFactoryPostProcessor 的后置回调,这样就可以覆盖所有的 BeanDefinition。
invokeBeanDefinitionRegistryPostProcessors 执行过程分析
在第一次调用 invokeBeanDefinitionRegistryPostProcessors 时,当前的 BeanDefinitionRegistryPostProcessor 只有一个,就是 org.springframework.context.annotation.ConfigurationClassPostProcessor 。
在 ConfigurationClassPostProcessor 类中,会解析 @Configuration、@ComponentScan、@ComponentScans、@Import 等注解。ConfigurationClassPostProcessor 实现了 BeanDefinitionRegistryPostProcessor 接口,而 BeanDefinitionRegistryPostProcessor 接口继承了 BeanFactoryPostProcessor 接口,所以 ConfigurationClassPostProcessor 中需要重写 postProcessBeanDefinitionRegistry() 方法和 postProcessBeanFactory() 方法。而 ConfigurationClassPostProcessor 类的作用就是通过这两个方法去实现的。更多细节可以参考 ConfigurationClassPostProcessor源码解析 这篇文章,写的非常 nice。
invokeBeanDefinitionRegistryPostProcessors 处理的核心过程如下:
- 1、ConfigurationClassPostProcessor#postProcessBeanDefinitionRegistry:BeanDefinition 触发加载的入口
- 2、ConfigurationClassPostProcessor#processConfigBeanDefinitions:解析配置类,在此处会解析配置类上的注解(ComponentScan扫描出的类,@Import注册的类,以及@Bean方法定义的类)
- 3、ComponentScanAnnotationParser#parse:根据注解的属性值来过滤加载 classpath 下的 beanDefinition(默认条件就是 basePackages,默认的 basePackages 为当前启动类的根包)
- 4、ClassPathBeanDefinitionScanner#doScan:处理 basePackages 下所以的 beanDefinition,被打了 @Service、@Compoment 等注解的类都会被解析到
- 5、DefaultListableBeanFactory#registerBeanDefinition:将 beanDefinition 注册到 BeanFactory 中(beanDefinitionMap 中)
那么到这里 TestBeanService 的 BeanDefinition 就被注册到 BeanFactory 中了。
BeanFactoryPostProcessor 对 BeanDefinition 的修改
在本篇文章所对应的案例工程中,也实现了一个 BeanFactoryPostProcessor ,没有实现任何排序接口。这个 TestBeanServiceBeanFactoryPostProcessor 的作用是将原来的 TestBeanService 修改为 ProxyTestBeanService。代码如下:
1
2
3
4
5
6
7
8
9
10
11
12
13
14
15
16
17
18
19
20
21
22
23
24
25
26
27
28
29
| public class TestBeanServiceBeanFactoryPostProcessor implements BeanFactoryPostProcessor {
@Override
public void postProcessBeanFactory(ConfigurableListableBeanFactory beanFactory) throws BeansException {
Iterable<String> beanNames = getBeanNames(beanFactory, TestBeanService.class);
beanNames.forEach(beanName -> {
System.out.println("begin to execute BeanFactoryPostProcessor...");
BeanDefinitionRegistry beanDefinitionRegistry = (BeanDefinitionRegistry) beanFactory;
BeanDefinition beanDefinition = beanFactory.getBeanDefinition(beanName);
RootBeanDefinition proxy = new RootBeanDefinition(ProxyTestBeanService.class);
proxy.setInitMethodName(beanDefinition.getInitMethodName());
proxy.setPropertyValues(beanDefinition.getPropertyValues());
proxy.setPrimary(beanDefinition.isPrimary());
proxy.setRole(BeanDefinition.ROLE_APPLICATION);
beanDefinitionRegistry.removeBeanDefinition(beanName);
beanDefinitionRegistry.registerBeanDefinition(beanName,proxy);
System.out.println("current bean type is : " + proxy.getBeanClass().getTypeName());
return;
});
}
}
|
在 invokeBeanFactoryPostProcessors 执行过程分析中已经分析了 BeanFactoryPostProcessor 执行的时机和过程,这里不再赘述。TestBeanServiceBeanFactoryPostProcessor 的作用就是先将原始的 TestBeanService 的 Beandefinition 从容器中移除掉,然后构建一个 ProxyTestBeanService 的 Beandefinition,然后注册到容器中,beanName 没有变,所以通过 BeanFactoryPostProcessor 可以修改最原始的 Bean 信息,也可以通过 BeanFactoryPostProcessor 来动态注册一个新的 Bean。
通过监听 ApplicationEnvironmentPreparedEvent 事件修改属性值
上面完成了对 TestBeanService 的 BeanDefinition 的修改,将 TestBeanService 对象换成了 ProxyTestBeanService。前面提到 TestBeanService 中有两个需要注入的值,一个是通过 @Autowired 注入,一个是通过 @Value 注入,先来看 @Value 注入。@Value 注入的值来自 Enviroment,这里关于 Enviroment 和配置解析及构建不多说,本篇中关注的是如何将 @Value 注入的值改变掉。
ApplicationEnvironmentPreparedEvent 事件是在环境准备完成时发送的事件,此时 Enviroment 已经准备好,可以随时为容器刷新提供环境变量支持。那么既然此时容器中的 Enviroment 对象已经 ready ,说明配置的 application.properties、系统参数等均已经被解析好了,而此时目标 Bean 还没有被刷新,其内部需要被注入的属性值还没有被注入,那么此时就可以通过监听这个事件,来对 Enviroment 中已经准备好的值进行修改,以改变实际被注入的值。代码如下:
1
2
3
4
5
6
7
8
9
10
11
12
13
14
15
16
| public class ChangeAppNameListener implements ApplicationListener<ApplicationEnvironmentPreparedEvent> {
@Override
public void onApplicationEvent(ApplicationEnvironmentPreparedEvent event) {
ConfigurableEnvironment environment = event.getEnvironment();
String applicationName = environment.getProperty("spring.application.name");
System.out.println("origin applicationName is : " + applicationName);
Properties props = new Properties();
props.put("spring.application.name", "updateAppName");
environment.getPropertySources().addFirst(new PropertiesPropertySource("decrypted_properties", props));
applicationName = environment.getProperty("spring.application.name");
System.out.println("updated applicationName is : " + applicationName);
}
}
|
@Value 注入 & @Autowired 注入
在 Spring 中,无论是 @Value 注入还是 @Autowired 注入,都是由 AutowiredAnnotationBeanPostProcessor 这个后置处理器处理的。
在很多开源的框架中,其内部自定义的注解也大都是通过 BeanPostProcessor 这个后置处理器来处理的。
AutowiredAnnotationBeanPostProcessor 中有个 AutowiredFieldElement 内部类,这个内部类的作用就是注入目标 bean 的属性值的。这里就包括 @Value 的注入和 @Autowired 注入。
Bean 属性注入发生的时机
容器刷新及属性注入调用堆栈如下:
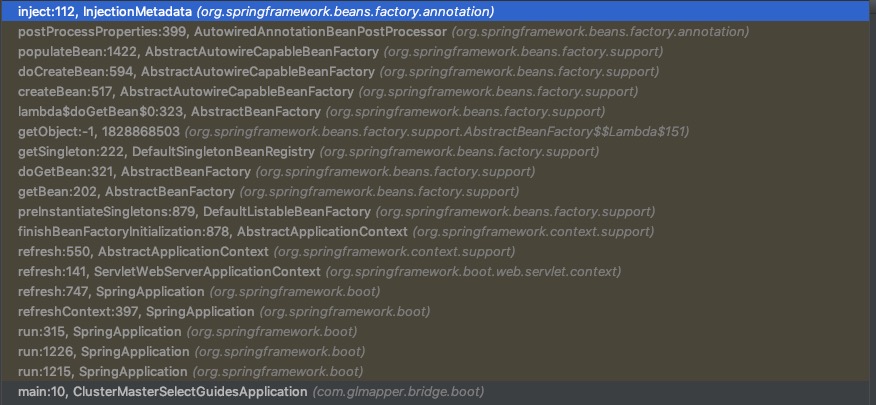
从堆栈看出,在容器刷新的最后阶段,会通过 finishBeanFactoryInitialization 这个方法实例化所有剩余的(非延迟初始化)单例 bean;这个过程就是绝大多数 bean 实例化的过程。这个过程中会涉及到以下两个比较重要的点:1、BeanPostProcessor 处理,2、依赖注入。从上面其实也可以看出,依赖注入的发生就是通过 BeanPostProcessor 处理完成的。下图为遍历所有目标属性,依次注入属性的过程:

Bean 属性注入发生的过程
这里以 @Autowired 注入为例,@Value 注入和 @Autowired 注入过程基本是一样的。@Autowired 注入相比于 @Value 注入,会涉及到初始化另外一个 Bean 的过程。
1
2
3
4
5
6
7
8
9
10
11
12
13
14
15
16
17
18
19
20
21
22
23
24
25
26
27
28
29
30
31
32
33
34
35
36
37
38
39
40
41
42
43
44
45
46
|
DependencyDescriptor desc = new DependencyDescriptor(field, this.required);
desc.setContainingClass(bean.getClass());
Set<String> autowiredBeanNames = new LinkedHashSet<>(1);
Assert.state(beanFactory != null, "No BeanFactory available");
TypeConverter typeConverter = beanFactory.getTypeConverter();
try {
value = beanFactory.resolveDependency(desc, beanName, autowiredBeanNames, typeConverter);
}
catch (BeansException ex) {
throw new UnsatisfiedDependencyException(null, beanName, new InjectionPoint(field), ex);
}
synchronized (this) {
if (!this.cached) {
if (value != null || this.required) {
this.cachedFieldValue = desc;
registerDependentBeans(beanName, autowiredBeanNames);
if (autowiredBeanNames.size() == 1) {
String autowiredBeanName = autowiredBeanNames.iterator().next();
if (beanFactory.containsBean(autowiredBeanName) &&
beanFactory.isTypeMatch(autowiredBeanName, field.getType())) {
this.cachedFieldValue = new ShortcutDependencyDescriptor(
desc, autowiredBeanName, field.getType());
}
}
}
else {
this.cachedFieldValue = null;
}
this.cached = true;
}
}
if (value != null) {
ReflectionUtils.makeAccessible(field);
field.set(bean, value);
}
|
属性注入发生在 populateBean(填充 Bean)的过程,在 Bean 属性填充完成之后就是 Bean 的实例化过程。
Bean 的实例化过程
这里截取 AbstractAutowireCapableBeanFactory#doCreateBean 方法中的一小段代码,来承接上下文:
1
2
3
4
5
6
7
8
9
10
11
|
Object exposedObject = bean;
try {
populateBean(beanName, mbd, instanceWrapper);
exposedObject = initializeBean(beanName, exposedObject, mbd);
}
catch (Throwable ex) {
}
|
这里通过代码就很好的和上一小节的内容关联起来了,即填充 Bean -> 实例化 Bean 。在 Bean 的实例化阶段会涉及到两个比较重要的扩展:1、BeanPostProcessor,2、InitializingBean。
BeanPostProcessor 的处理时机
BeanPostProcessor 有两个抽象方法,一个是实例化之前调用,一个是实例化之后调用。InitializingBean 接口只有一个 afterPropertiesSet 方法,afterPropertiesSet 方法的执行介于实例化之前实例化之后调用之间。BeanPostProcessor 的处理时机是在调用 initializeBean 方法中触发的,下面为 initializeBean 方法中的部分代码片段:
1
2
3
4
5
6
7
8
9
10
11
12
13
14
15
16
17
18
| Object wrappedBean = bean;
if (mbd == null || !mbd.isSynthetic()) {
wrappedBean = applyBeanPostProcessorsBeforeInitialization(wrappedBean, beanName);
}
try {
invokeInitMethods(beanName, wrappedBean, mbd);
}
catch (Throwable ex) {
throw new BeanCreationException(
(mbd != null ? mbd.getResourceDescription() : null),
beanName, "Invocation of init method failed", ex);
}
if (mbd == null || !mbd.isSynthetic()) {
wrappedBean = applyBeanPostProcessorsAfterInitialization(wrappedBean, beanName);
}
|
这里的 bean 对象实际上已经是完整的 bean 了,postProcessBeforeInitialization 和 postProcessAfterInitialization 是相对于是否执行 InitializingBean 的 afterPropertiesSet 和执行 Bean 指定的 initMethod 方法而言的。
使用 BeanPostProcessor 修改 Bean
从 initializeBean 方法中可以看出,了,postProcessBeforeInitialization 和 postProcessAfterInitialization 两处回调返回放回的是 wrappedBean,也就意味着我们可以在这两个方法中对容器中的原始 Bean 做一些处理,比如代理一层原始的 Bean,或者修改 Bean 中的一些属性等。
在案例工程中提供了一个 TestBeanServiceProcessor ,其作用是对 TestBeanService 类型的 Bean 做一层代理,使得在执行 TestBeanService 中方法的前后做一些埋点。
1
2
3
4
5
6
7
8
9
10
11
12
13
14
15
16
17
18
19
20
21
22
23
24
25
26
27
28
29
30
31
32
33
34
35
36
37
38
39
40
41
42
43
44
45
46
47
48
49
|
public class TestBeanServiceProcessor implements BeanPostProcessor {
@Override
public Object postProcessBeforeInitialization(Object bean, String beanName) throws BeansException {
if (bean instanceof TestBeanService){
System.out.println("begin to execute postProcessBeforeInitialization.");
TestBeanWrapperService testBeanService = new TestBeanWrapperService((TestBeanService)bean);
return testBeanService;
}
return bean;
}
@Override
public Object postProcessAfterInitialization(Object bean, String beanName) throws BeansException {
if (bean instanceof TestBeanService){
System.out.println("begin to execute postProcessAfterInitialization.");
}
return bean;
}
}
public class TestBeanWrapperService extends TestBeanService {
private final TestBeanService delegate;
public TestBeanWrapperService(TestBeanService delegate){
this.delegate = delegate;
}
@Override
public String test() {
try {
before();
return delegate.test();
} finally {
after();
}
}
private void before(){
System.out.println("before execute test.");
}
private void after(){
System.out.println("after execute test.");
}
}
|
使用 InitializingBean
如果一个 bean 集成了 InitializingBean 接口,那么就需要重写其 afterPropertiesSet 方法。这里感觉有点漏洞,afterPropertiesSet 动作其实早就完成了,另外因为 afterPropertiesSet 是在 postProcessAfterInitialization 方法之前调用,所以还是可以在 postProcessAfterInitialization 对属性做修改。实际使用过程中需要关注下这个点,一般情况下,我们会在 afterPropertiesSet 中做一些初始化动作,比如启动连接 Zookeeper。
1
2
3
4
5
6
7
| public class TestBeanService implements InitializingBean {
@Override
public void afterPropertiesSet() throws Exception {
System.out.println("begin to execute afterPropertiesSet...");
}
}
|
指定 Bean 的 init-method 方法
init-method 方法只能通过 @Bean 或者 xml 方式指定,如果是使用 @Component 或者 @Service 注解标准的 Bean ,则可以通过 @PostConstruct 注解标注方法,对应的是 destroy-method 和 @PreDestroy 。
1
2
3
4
5
6
7
8
9
10
11
12
13
| public class TestBeanService implements InitializingBean{
public void init(){
System.out.println("begin to execute init...");
}
}
@Bean(initMethod = "init")
public TestBeanService testBeanService(){
return new TestBeanService();
}
|
总结
本篇围绕 TestBeanService 这个 Bean 展开,对其生命周期,及其生命周期各个阶段扩展点进行了介绍,包括修改注入的属性值、修改其 BeanDefinition、修改 Bean 实例等等,从扩展点的视角来洞悉一个 Bean 的生命周期。
BeanFactoryPostProcessor 对于 init-method 的影响
因为 init-method 这个点是后面想起来加上去的,在实际测试过程中,发现 TestBeanService 中指定的 init 方法没有被执行(正常情况下是在 afterPropertiesSet 之后就会执行的);对于这个 TestBeanService 在案例工程中有两处对其进行了修改,一个是修改其 BeanDefinition ,一个是修改 其 Bean 实例;最终拿到的 bean 的类型是 TestBeanWrapperService,在此之前 Bean 的类型是 ProxyTestBeanService ,无论是TestBeanWrapperService 还是 ProxyTestBeanService 都是 TestBeanService 的子类,init 方法又是 public 的,所以从这个角度来看,不可能不生效。所以基本可以排除因为访问权限问题导致。最后 debug 下面代码发现,mbd.getInitMethodName() 返回的是 null, mbd 是 RootBeanDefinition;
PS: BeanDefinition 中 getInitMethodName 方法是在 Spring 5.1 版本之后才有的,之前版本都是 在 AbstractBeanDefinition 这个抽象类中定义。
1
2
3
4
5
6
7
8
9
| if (mbd != null && bean.getClass() != NullBean.class) {
String initMethodName = mbd.getInitMethodName();
if (StringUtils.hasLength(initMethodName) &&
!(isInitializingBean && "afterPropertiesSet".equals(initMethodName)) &&
!mbd.isExternallyManagedInitMethod(initMethodName)) {
invokeCustomInitMethod(beanName, bean, mbd);
}
}
|
问题出在这里,在 TestBeanServiceBeanFactoryPostProcessor 处理时,没有将原始 BeanDefinition 的 initMethod 给新的 ProxyTestBeanService,所以导致后面所有基于此实例化的 bean 的 BeanDefinition 都没有 initMethod 方法。在TestBeanServiceBeanFactoryPostProcessor#postProcessBeanFactory 方法中补充设置 InitMethodName 之后问题解决。
1
2
|
proxy.setInitMethodName(beanDefinition.getInitMethodName());
|
附:案例工程地址及参考