基于 ChatGLM 等大语言模型与 Langchain 等应用框架实现,开源、可离线部署的检索增强生成(RAG)大模型知识库项目。
本地环境
品牌:戴尔 optiplex 7000
操作系统:win11 家庭版 x64
处理器:12th Gen Intel(R) Core(TM) i9-12900 2.4 GHz
显卡:RTX 3060 12g
nvidia-smi 查看 GPU 信息如下:
1
2
3
4
5
6
7
8
9
10
11
12
13
14
15
16
17
18
19
20
21
22
23
24
25
26
27
28
29
30
Fri Jan 5 14:38:11 2024 +---------------------------------------------------------------------------------------+ | NVIDIA-SMI 536.19 Driver Version: 536.19 CUDA Version: 12.2 | |-----------------------------------------+----------------------+----------------------+ | GPU Name TCC/WDDM | Bus-Id Disp.A | Volatile Uncorr. ECC | | Fan Temp Perf Pwr:Usage/Cap | Memory-Usage | GPU-Util Compute M. | | | | MIG M. | |=========================================+======================+======================| | 0 NVIDIA GeForce RTX 3060 WDDM | 00000000:01:00.0 On | N/A | | 0% 35C P8 7W / 170W | 12063MiB / 12288MiB | 7% Default | | | | N/A | +-----------------------------------------+----------------------+----------------------+ +---------------------------------------------------------------------------------------+ | Processes: | | GPU GI CI PID Type Process name GPU Memory | | ID ID Usage | |=======================================================================================| | 0 N/A N/A 6788 C+G ...CBS_cw5n1h2txyewy\TextInputHost.exe N/A | | 0 N/A N/A 6940 C+G ...siveControlPanel\SystemSettings.exe N/A | | 0 N/A N/A 7876 C+G C:\Windows\explorer.exe N/A | | 0 N/A N/A 8816 C+G ...on\120.0.2210.91\msedgewebview2.exe N/A | | 0 N/A N/A 8988 C+G ...nt.CBS_cw5n1h2txyewy\SearchHost.exe N/A | | 0 N/A N/A 9124 C+G ...2txyewy\StartMenuExperienceHost.exe N/A | | 0 N/A N/A 15560 C+G ...Programs\Microsoft VS Code\Code.exe N/A | | 0 N/A N/A 16528 C+G ...ekyb3d8bbwe\PhoneExperienceHost.exe N/A | | 0 N/A N/A 17260 C ...\anaconda3\envs\Chatchat\python.exe N/A | | 0 N/A N/A 21584 C+G ...oogle\Chrome\Application\chrome.exe N/A | +---------------------------------------------------------------------------------------+
软件环境安装 Python 版本使用的是官方 wiki 中建议的版本区别: 3.11.5
Anaconda 安装 Anaconda 用于管理 python 虚拟环境。Conda 是一个开源的包管理系统和环境管理系统,主要用于数据科学、机器学习和科学计算等领域。它是 Anaconda 发行版的一部分,也可以作为 Miniconda 的一部分单独安装。Conda可以帮助用户轻松地安装、管理和更新软件包、库和依赖项,而无需担心不同软件包之间的冲突。它还允许用户创建、管理和切换不同的虚拟环境,使得在同一台机器上同时进行多个项目开发变得更加便捷。Conda也提供了对Python和非Python软件包的支持,这使得它成为一个广泛使用的工具,不仅局限于Python生态系统。
按安装指引默认安装即可,安装完测试:
1
2
~ conda -V ~ conda 23.11.0
cuda 安装 CUDA(Compute Unified Device Architecture)是由NVIDIA开发的并行计算平台和应用程序编程接口(API)。它允许开发人员使用C/C++、Python等编程语言来利用NVIDIA GPU的并行计算能力。CUDA使开发人员能够在GPU上编写高性能的通用并行程序,用于加速科学计算、深度学习、图形渲染和其他需要大量并行计算的领域。通过CUDA,开发人员可以利用GPU的大量计算核心并行处理数据,加快计算速度。
cuda 所有版本归档地址:https://developer.nvidia.com/cuda-toolkit-archive,可以在这里下载需要的版本;在上述 nvidia-smi 查看的 GPU 信息看到,我本机支持的 cuda 版本最高是 12.2。
pytorch 安装 PyTorch是一个开源的机器学习库,专注于深度学习任务。它由Facebook的人工智能研究团队开发并维护,提供了丰富的工具和接口,用于构建和训练神经网络模型。
安装时可以在这里 https://download.pytorch.org/whl/torch_stable.html 下载。根据需要按照不同操作系统、是否是gpu 环境等找对应的版本即可。
gpu 版本安装
1
2
3
4
5
6
# torch pip install https://download.pytorch.org/whl/cu121/torch-2.1.2%2Bcu121-cp310-cp310-win_amd64.whl # torchaudio pip install https://download.pytorch.org/whl/cu121/torchaudio-2.1.2%2Bcu121-cp310-cp310-win_amd64.whl # torchvision pip install https://download.pytorch.org/whl/cu121/torchvision-0.16.2%2Bcu121-cp310-cp310-win_amd64.whl
cpu 版本安装(这里用了清华源)
1 pip install torch torchvision torchaudio --index-url https://download.pytorch.org/wh1/cull8 -i https://pypi.tuna.tsinghua.edu.cn/simple/
环境测试 创建 python 运行虚拟环境 打开 Anaconda Prompt 终端命令行工具,使用 conda 创建 python 运行虚拟环境
1
2
3
4
5
6
7
8
9
10
11
12
(base) ~ conda create -n Chatchat python=3.11.5 (base) ~ done (base) ~ # (base) ~ # To activate this environment, use (base) ~ # (base) ~ # $ conda activate Chatchat (base) ~ # (base) ~ # To deactivate an active environment, use (base) ~ # (base) ~ # $ conda deactivate (base) ~ conda activate Chatchat # 激活虚拟环境 (Chatchat) ~
测试 pytorch 1 2 3 4 5 6 7 8 9 10 11 12 13 (Chatchat) ~ python Python 3.11.5 # 省略 .... >>> import torch >>> torch.cuda.is_available() False >>> x = torch.rand(5, 3) >>> print(x) tensor([[0.8827, 0.8297, 0.5390], [0.4590, 0.8473, 0.4074], [0.4045, 0.0082, 0.4121], [0.7649, 0.3901, 0.1535], [0.5408, 0.8168, 0.8615]]) >>>
Langchain-Chatchat 下载 本文是基于 常规模式本地部署方案 进行部署的。代码拉取 & 安装依赖
1 2 3 4 5 6 7 8 9 10 11 12 13 # 拉取仓库 $ git clone --recursive https://github.com/chatchat-space/Langchain-Chatchat.git # 进入目录 $ cd Langchain-Chatchat # 安装全部依赖 $ pip install -r requirements.txt # 默认依赖包括基本运行环境(FAISS向量库)。以下是可选依赖: - 如果要使用 milvus/pg_vector 等向量库,请将 requirements.txt 中相应依赖取消注释再安装。 - 如果要开启 OCR GPU 加速,请安装 rapidocr_paddle[gpu] - 如果要使用在线 API 模型,请安装对用的 SDK
在执行安装依赖时遇到 https://github.com/chatchat-space/Langchain-Chatchat/issues/2533 这个问题,采用 issue 中提的方式,使用 conda 进行安装的。这里可以先将 requirements.txt 中的 jq 依赖先注释调
1 2 # rapidocr_paddle[gpu]>=1.3.0.post5 # gpu accelleration for ocr of pdf and image files # jq>=1.6.0 # for .json and .jsonl files. suggest `conda install jq` on windows
然后再执行 pip install -r requirements.txt,然后再使用 conda install jq 安装 jq。
Ps: 笔者之前没有做过 python 开发,最大体验是,一直在装各种包….
此外,为方便用户 API 与 webui 分离运行,可单独根据运行需求安装依赖包。
如果只需运行 API,可执行:
1 2 $ pip install -r requirements_api.txt # 默认依赖包括基本运行环境(FAISS向量库)。如果要使用 milvus/pg_vector 等向量库,请将 requirements.txt 中相应依赖取消注释再安装。
如果只需运行 WebUI,可执行:
1 $ pip install -r requirements_webui.txt
其他建议直接参考官方 wiki 即可,如果有问题先查官方 issue 。
模型下载 安装官方手册,下载两个模型:m3e-base 内置模型和 chatglm2-6b-int4 模型。额,实际上 https://huggingface.co/moka-ai/m3e-base 和 https://huggingface.co/THUDM/chatglm2-6b 通过 git 直接 拉是拉不下来的,最后是在 files and versions 下手动下载的。chatglm2-6b 也是一样。即使下载了 lfs 也是不行的,可能打开方式不对?
配置修改和文件修改 批量修改配置文件名 针对 Langchain-Chatchat,批量复制 configs 目录下所有的配置文件,去掉 example 后缀:
1 python copy_config_example.py
截图如下:
修改 model_config.py 文件
修改 server_config.py 1 2 # 各服务器默认绑定 host。如改为"0.0.0.0"需要修改下方所有XX_SERVER的host DEFAULT_BIND_HOST = “127.0.0.1"
部署 知识库初始化
这里因为前面安装依赖时一直出现 jq 报错问题,导致很多依赖没有安装成功,在执行数据库初始化时报了一堆依赖找不到,也是一个个 install 的,😭….
启动项目 执行日志大致如下:
1 2 3 4 5 6 7 8 9 10 11 12 13 14 15 16 17 18 19 20 21 22 23 24 25 26 27 28 29 30 31 32 33 34 35 36 37 38 39 40 41 42 43 44 45 46 47 48 49 50 51 52 53 54 55 56 57 58 59 60 61 62 63 64 65 66 67 68 69 70 71 72 73 74 75 76 77 78 79 80 81 82 83 84 85 86 87 88 ==============================Langchain-Chatchat Configuration============================== 操作系统:Windows-10-10.0.22000-SP0. python版本:3.10.11 | packaged by Anaconda, Inc. | (main, May 16 2023, 00:55:32) [MSC v.1916 64 bit (AMD64)] 项目版本:v0.2.9 langchain版本:0.0.353. fastchat版本:0.2.34 当前使用的分词器:ChineseRecursiveTextSplitter 当前启动的LLM模型:['chatglm2-6b'] @ cuda {'device': 'cuda', 'host': '127.0.0.1', 'infer_turbo': False, 'model_path': 'D:\\llm\\chatglm3-6b', 'model_path_exists': True, 'port': 20002} 当前Embbedings模型: m3e-base @ cuda ==============================Langchain-Chatchat Configuration============================== 2024-01-05 14:17:15,651 - startup.py[line:651] - INFO: 正在启动服务: 2024-01-05 14:17:15,651 - startup.py[line:652] - INFO: 如需查看 llm_api 日志,请前往 D:\llm\Langchain-Chatchat\logs 2024-01-05 14:17:20 | ERROR | stderr | INFO: Started server process [16928] 2024-01-05 14:17:20 | ERROR | stderr | INFO: Waiting for application startup. 2024-01-05 14:17:20 | ERROR | stderr | INFO: Application startup complete. 2024-01-05 14:17:20 | ERROR | stderr | INFO: Uvicorn running on http://127.0.0.1:20000 (Press CTRL+C to quit) 2024-01-05 14:17:21 | INFO | model_worker | Loading the model ['chatglm2-6b'] on worker 2ed3839d ... Loading checkpoint shards: 0%| | 0/7 [00:00<?, ?it/s] Loading checkpoint shards: 14%|██████████████████▋ | 1/7 [01:05<06:31, 65.24s/it] Loading checkpoint shards: 29%|█████████████████████████████████████▍ | 2/7 [01:41<04:00, 48.07s/it] Loading checkpoint shards: 43%|████████████████████████████████████████████████████████▏ | 3/7 [01:41<01:45, 26.36s/it] Loading checkpoint shards: 57%|██████████████████████████████████████████████████████████████████████████▊ | 4/7 [01:42<00:48, 16.14s/it] Loading checkpoint shards: 71%|█████████████████████████████████████████████████████████████████████████████████████████████▌ | 5/7 [01:42<00:21, 10.51s/it] Loading checkpoint shards: 86%|████████████████████████████████████████████████████████████████████████████████████████████████████████████████▎ | 6/7 [02:13<00:17, 17.35s/it] Loading checkpoint shards: 100%|███████████████████████████████████████████████████████████████████████████████████████████████████████████████████████████████████| 7/7 [02:50<00:00, 23.71s/it] Loading checkpoint shards: 100%|███████████████████████████████████████████████████████████████████████████████████████████████████████████████████████████████████| 7/7 [02:50<00:00, 24.32s/it] 2024-01-05 14:20:11 | ERROR | stderr | 2024-01-05 14:20:16 | INFO | model_worker | Register to controller INFO: Started server process [7956] INFO: Waiting for application startup. INFO: Application startup complete. INFO: Uvicorn running on http://127.0.0.1:7861 (Press CTRL+C to quit) ==============================Langchain-Chatchat Configuration============================== 操作系统:Windows-10-10.0.22000-SP0. python版本:3.10.11 | packaged by Anaconda, Inc. | (main, May 16 2023, 00:55:32) [MSC v.1916 64 bit (AMD64)] 项目版本:v0.2.9 langchain版本:0.0.353. fastchat版本:0.2.34 当前使用的分词器:ChineseRecursiveTextSplitter 当前启动的LLM模型:['chatglm2-6b'] @ cuda {'device': 'cuda', 'host': '127.0.0.1', 'infer_turbo': False, 'model_path': 'D:\\llm\\chatglm3-6b', 'model_path_exists': True, 'port': 20002} 当前Embbedings模型: m3e-base @ cuda 服务端运行信息: OpenAI API Server: http://127.0.0.1:20000/v1 Chatchat API Server: http://127.0.0.1:7861 Chatchat WEBUI Server: http://127.0.0.1:8501 ==============================Langchain-Chatchat Configuration============================== Welcome to Streamlit! If you’d like to receive helpful onboarding emails, news, offers, promotions, and the occasional swag, please enter your email address below. Otherwise, leave this field blank. Email: 2024-01-05 14:24:24 | INFO | stdout | INFO: 127.0.0.1:63380 - "GET /v1 HTTP/1.1" 404 Not Found INFO: 127.0.0.1:63456 - "GET / HTTP/1.1" 307 Temporary Redirect INFO: 127.0.0.1:63456 - "GET /docs HTTP/1.1" 200 OK INFO: 127.0.0.1:63456 - "GET /swagger-ui.css HTTP/1.1" 200 OK INFO: 127.0.0.1:63457 - "GET /swagger-ui-bundle.js HTTP/1.1" 200 OK INFO: 127.0.0.1:63457 - "GET /openapi.json HTTP/1.1" 200 OK INFO: 127.0.0.1:63456 - "GET /favicon.png HTTP/1.1" 200 OK INFO: 127.0.0.1:63645 - "GET /docs HTTP/1.1" 200 OK INFO: 127.0.0.1:63645 - "GET /swagger-ui.css HTTP/1.1" 200 OK INFO: 127.0.0.1:63646 - "GET /swagger-ui-bundle.js HTTP/1.1" 200 OK INFO: 127.0.0.1:63646 - "GET /openapi.json HTTP/1.1" 200 OK INFO: 127.0.0.1:63646 - "GET /favicon.png HTTP/1.1" 200 OK INFO: 127.0.0.1:63744 - "POST /chat/chat HTTP/1.1" 200 OK
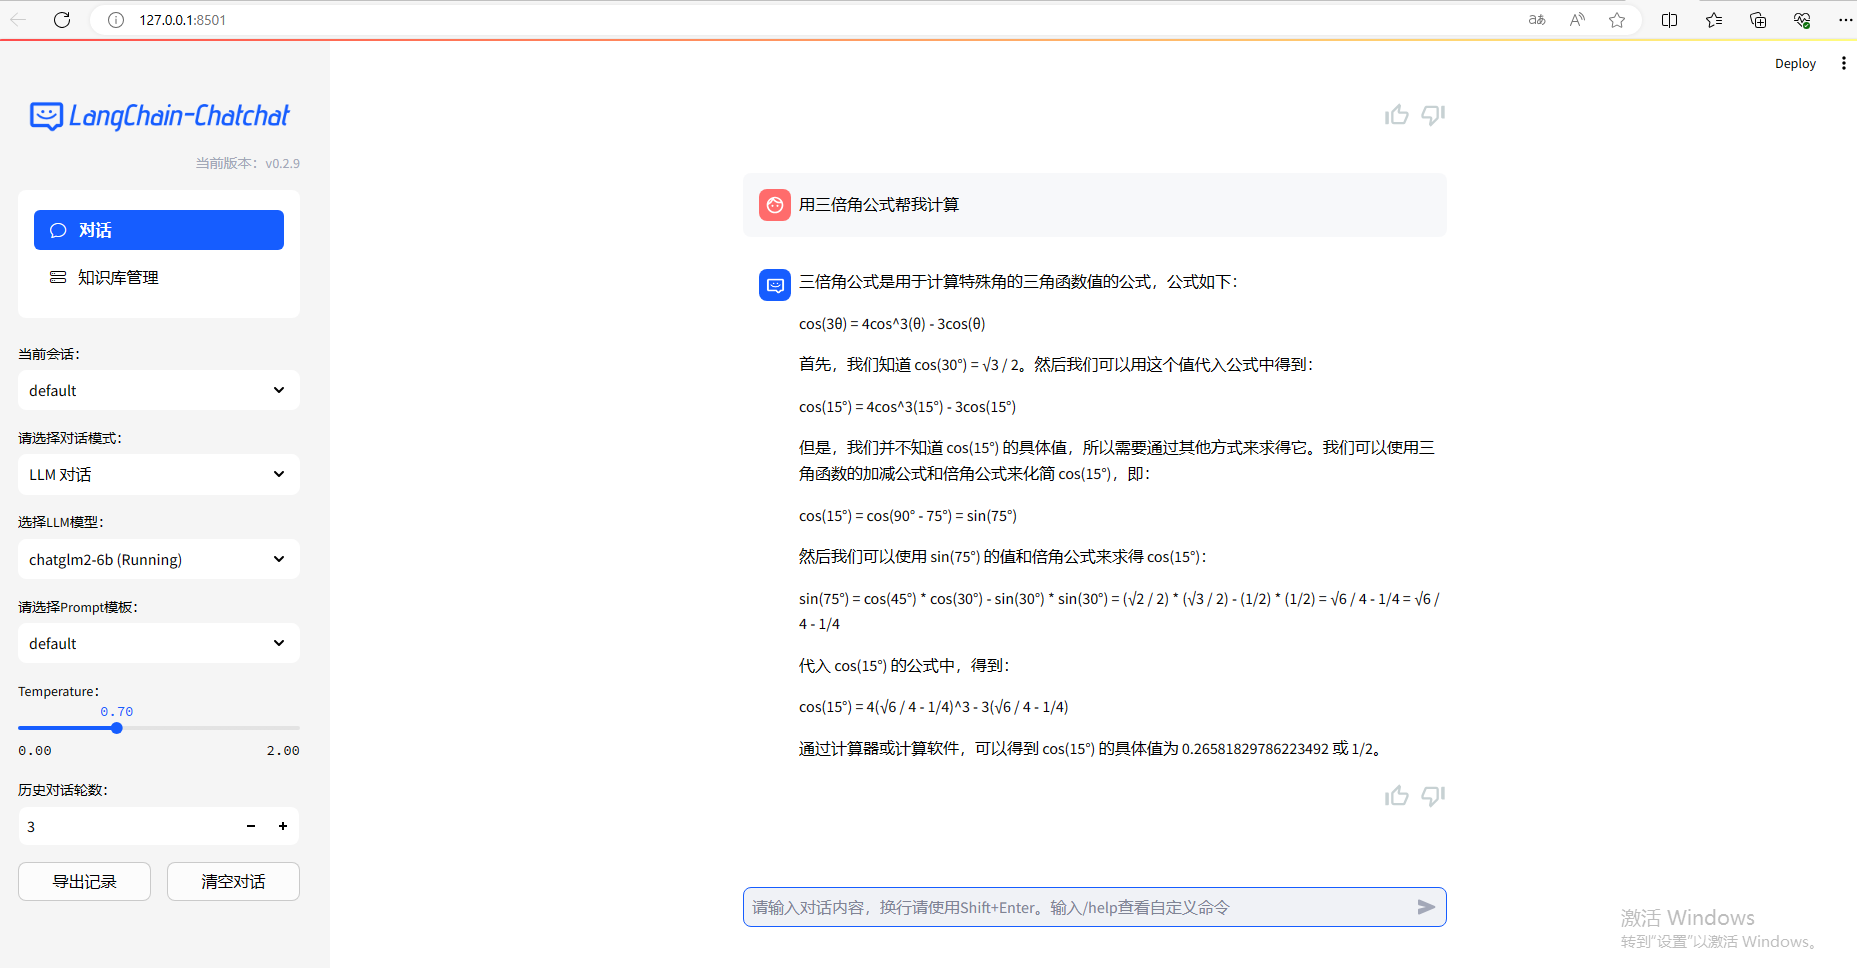
运行效果如下:
总结 作为一个连门都没入的 java 工程师,前后花了差不多 1 天多时间;主要坑就是 Could not build wheels for jq, which is required to install pyproject.toml-based projects 这个报错让我纠结了很久;官方 issue 关于这个问题也有不少社区反馈:https://github.com/chatchat-space/Langchain-Chatchat/issues?q=jq。另外还是对于官方文档中给的 wiki 看的太粗,也导致在某些点上浪费了一些时间。
通过此次部署,首先是对于大模型本地部署的流程有了一些基本印象和思路;对于如 conda、cuda、pytorch 等相关框架及工具有一些初步认识,还是有一些收获的。
参考